Friday 6/23/15 0830.
I've worked for months to get the ergonomics of my bike fine tuned and get in lots of saddle time. Now, with slightly more than 72 hours to the start of the 2015 Iron Butt Rally, my planning has gone amok. Here is the current status of my bike.
Yes, those are parts lying all over the garage floor and no bike in the picture! I took it in last week for a major tune up so it would be ready. They found a bad switch which caused the starter motor to engage intermittently. Not starting when you want is pretty bad.
This is what I hate about Triumph, parts ALWAYS have to come from the UK. Parts are supposed to come in this AM and (supposedly) I'll have my bike back this afternoon. It will take me several hours to get it back together. Then I have a 12 hour trip to Albuquerque, NM. I'm okay as long as I get there in time to finish check in on Sunday.
Nothing like being well rested and unstressed for the start of the rally.
Friday, June 26, 2015
Sunday, June 21, 2015
Triumph Trophy SE Fuel Economy
When I first got the TTSE in June of '13 I was extremely happy to find that it was quite miserly with gasoline. Even on Nevada two lane highways (read as high speed) it stayed at 40+ MPG.
That all seemed to go amok about a year ago. I have experienced wild fluctuations in fuel economy. From as high as 50MPG at leisurely paces to as low as 30MPG for no apparent reason. I have tried to analyze all possible causes of these anomalies.
Bad gas, ethanol, gas brand, headwinds, temperatures, speed, you name it I've considered it. All of these factors can and do impact fuel economy but I couldn't seem to isolate any one factor as the major contributor. If anything, it appeared to be temperature related where lower temperatures yielded worse MPG.
I finally found out why there was a change in MPG, about a year ago I got a new custom seat made! Now this may sound ridiculous but bear with me. I had them raise the seat so my knees would have less bend. A recent discussion on Facebook got me to to considering windshield height. The TTSE has an electrically adjustable windshield and I normally keep it just below my line of sight.
On a recent trip I discovered that the TTSE is EXTREMELY sensitive to windshield height (obviously if Triumph did any wind tunnel testing they either didn't test with varying windshield heights or they didn't optimize for that). With the windshield fully down I was able to average 46MPG over a 700 mile trip with a moving average of 70MPH. By watching the instantaneous fuel consumption readout from the ECU, I was able to determine that raising the windshield by as little as 1" would drop 4 o 5MPG off of my reading!
Therein, was the root of my problem. I raised my seat about a year ago and the windshield height accordingly. That also explains why the cold weather was a high candidate for the problem. When it's cold I raise the windshield to stay warmer.
If you have an adjustable windshield take this into consideration if you are trying to maximize your range.
That all seemed to go amok about a year ago. I have experienced wild fluctuations in fuel economy. From as high as 50MPG at leisurely paces to as low as 30MPG for no apparent reason. I have tried to analyze all possible causes of these anomalies.
Bad gas, ethanol, gas brand, headwinds, temperatures, speed, you name it I've considered it. All of these factors can and do impact fuel economy but I couldn't seem to isolate any one factor as the major contributor. If anything, it appeared to be temperature related where lower temperatures yielded worse MPG.
I finally found out why there was a change in MPG, about a year ago I got a new custom seat made! Now this may sound ridiculous but bear with me. I had them raise the seat so my knees would have less bend. A recent discussion on Facebook got me to to considering windshield height. The TTSE has an electrically adjustable windshield and I normally keep it just below my line of sight.
On a recent trip I discovered that the TTSE is EXTREMELY sensitive to windshield height (obviously if Triumph did any wind tunnel testing they either didn't test with varying windshield heights or they didn't optimize for that). With the windshield fully down I was able to average 46MPG over a 700 mile trip with a moving average of 70MPH. By watching the instantaneous fuel consumption readout from the ECU, I was able to determine that raising the windshield by as little as 1" would drop 4 o 5MPG off of my reading!
Therein, was the root of my problem. I raised my seat about a year ago and the windshield height accordingly. That also explains why the cold weather was a high candidate for the problem. When it's cold I raise the windshield to stay warmer.
If you have an adjustable windshield take this into consideration if you are trying to maximize your range.
Thursday, June 4, 2015
The Missing Gallon (Triumph Trophy SE)
Ever wonder how big the gas tank really is on a Triumph Trophy SE? I know I have. The manufacturer lists the Fuel capacity at 25 L (6.6 US gal). I've never come close to putting that much gas in the tank.
Since I do a lot of long distance riding fuel management is very important. I have an auxiliary fuel tank to extend my range and only buy gas when I need to. My theoretical capacity is just under the
Iron Butt Rally™ maximum of 11.5 gallons. My aux tank is 4.8 gallons so coupled with the stock tank I should have 11.4 gallons. I've never managed to put more than 10.5 gallons in it and I was worried about running out of fuel at those times.
Here is some background discussion about the Trophy's instrumentation. The on board computer shows some interesting information. You can display lots of information but the ones I want to focus on are distance to empty (DTE) and gallons consumed (GC). I've been displaying GC for the last 40,000 miles and have found it very useful and accurate enough that I trust it. Rarely has the displayed GC varied by more that 10% of what the fuel pump said I had put in. This error could possibly be explained by temperature variations in the fuel.
The low fuel light comes on at 1/4 tank at which time the DTE moves to the forefront of the display. The low fuel light and the DTE have no correlation. Depending on what kind of gas mileage you are getting the DTE can be anywhere from 40 to 80 miles when the low fuel light comes on. The DTE will count down and reaches zero (0) exactly as the last fuel indicator bar goes dark.
After 60,000 miles I decided to conduct an experiment. I have developed enough confidence in the GC display to trust that it was accurate enough to test my tank capacity. I was returning from a 7000 mile journey and was trying to stretch my range so I could get home without a final fuel stop.
My low fuel light came on and the GC reported that 4.4 gallons were consumed. I watched the DTE count down to zero and logged the odometer and the GC. GC now reported that 5.4 gallons had been burnt. I motored on and ran out of gas 40 miles later! GC now said I had burnt 6.2 gallons. I had FINALLY found that missing gallon.
Since I do a lot of long distance riding fuel management is very important. I have an auxiliary fuel tank to extend my range and only buy gas when I need to. My theoretical capacity is just under the
Iron Butt Rally™ maximum of 11.5 gallons. My aux tank is 4.8 gallons so coupled with the stock tank I should have 11.4 gallons. I've never managed to put more than 10.5 gallons in it and I was worried about running out of fuel at those times.
Here is some background discussion about the Trophy's instrumentation. The on board computer shows some interesting information. You can display lots of information but the ones I want to focus on are distance to empty (DTE) and gallons consumed (GC). I've been displaying GC for the last 40,000 miles and have found it very useful and accurate enough that I trust it. Rarely has the displayed GC varied by more that 10% of what the fuel pump said I had put in. This error could possibly be explained by temperature variations in the fuel.
The low fuel light comes on at 1/4 tank at which time the DTE moves to the forefront of the display. The low fuel light and the DTE have no correlation. Depending on what kind of gas mileage you are getting the DTE can be anywhere from 40 to 80 miles when the low fuel light comes on. The DTE will count down and reaches zero (0) exactly as the last fuel indicator bar goes dark.
After 60,000 miles I decided to conduct an experiment. I have developed enough confidence in the GC display to trust that it was accurate enough to test my tank capacity. I was returning from a 7000 mile journey and was trying to stretch my range so I could get home without a final fuel stop.
My low fuel light came on and the GC reported that 4.4 gallons were consumed. I watched the DTE count down to zero and logged the odometer and the GC. GC now reported that 5.4 gallons had been burnt. I motored on and ran out of gas 40 miles later! GC now said I had burnt 6.2 gallons. I had FINALLY found that missing gallon.
Well, it's nice to know there is a reserve but I can only see using it in an extreme situation. When your gas gauge says empty, the DTE says ZERO, and the low fuel light is screaming at you it's difficult to have faith and believe that there is more gas in the tank. [There's a song about have faith and believe "Desert Pete"]
It's a shame that Triumph couldn't have been more accurate with their instrumentation. I'd sure like to see it like my BMW K1200LT. The low fuel light came on when the DTE was at 40 miles based on current fuel economy. It was NOT tied to the fuel gauge. Once it went below 10 miles it turned to dashes. Not ideal but better than the Trophy. I have to stare at a bright yellow low fuel light for up to 100 miles which can translate to 1 1/2 to 3 hours.
Thursday, April 9, 2015
Fitting a Garmin nuvi 2797 to a Motorcycle
There has been a lot of discussion in my community about Garmin's nĂ¼vi® 2797LMT. Considering the size and features, Garmin's $270 is a bargain and street prices are $40 less. When you compare this to Garmin's Zumo line for motorcycles, with prices from $600 to $900, taking the chance of putting this on a motorcycle is highly tempting.
Based on Greg Rice's article on his experiences with I purchased one used from a friend. [Greg's write up of the unit's features and screenshots is excellent which I'll not reproduce] The unit I purchased came with the Ram mounting so I was quite pleased with my $185 price, I mounted it up and have been playing with it without having it wired to my audio system.
Since I'm tooling up for the 2015 Iron Butt Rally™ I needed to get the audio connected to my bike. With that done, I am mightily impressed with my short test run. I never thought having voice actuation would be an important feature but, based on my initial testing, it looks like it's going to be a winner. Of course, a giant display is nothing to scoff at.
Here you can see it mounted on the left side of my dash shelf.
Note the sunshade. I had a shade like this on my K1200LT with the Touratech locking mount and really missed having it. Not so much for the shade, but for having a place to stick my pens. I LOVE velcro.
I followed Greg's procedure with only one problem with removing the back of the unit. After you remove the screws (one of these kits from Harbor Freight is essential for working on miniature electronics), the back didn't come off. Turns out there are little tabs around the periphery that need to be disengaged. This requires prying the edges up, always a concerning task since the the tabs break easily. Some type of spudger tool is preferable to a screwdriver or knife which can mar the case.
I'm posting my pictures, not because Greg's are deficient in any manner but because my job was a little cleaner. In all fairness I was trained as an aerospace electronics assembly technician in a previous life.
| This is the before I messed it up shot. |
| Rather than cut the speaker wires I removed the rubber coating and unsoldered the wires. |
| The microphone wires needed to be cut. Ends are tinned ready for splice. Mic pigtail is taped down to inside of case. I drilled two holes for the audio wire and put rubber grommets in place. |
| Splices have been made, shrink wrapped, and taped to the case. Zip ties are to prevent wires from being easily pulled out. |
| I almost forgot to label which wire was which. [FWIW one of these printers is really nice to have around.] |
| Some RTV sealant to resist water intrusion. |
| Taped over non-essential openings (speaker grill and SD card slot) to minimize the risk of water intrusion. |
Tuesday, March 31, 2015
Rally Preparation (Pelican/Storm Case Lid Organizer)
I've finally caught up on my work and have started fixing my bike up for the rally season. There are several items I've done. This will be the first post of several more.
I got this idea from one of my customers and decided to implement it.
This is a lid organizer for a Pelican/Storm iM2500 case. Well, maybe not so much an organizer, as a laptop holder.
The laptop can be used in place.
I plan on affixing some pen/pencil holders to the inside and a document holder to the outside. This is a trial and error design method.
I'll be testing it out with some road work and then the big test will be the 54 hour Heart of Texas Rally coming up in 3 weeks.
I got this idea from one of my customers and decided to implement it.
This is a lid organizer for a Pelican/Storm iM2500 case. Well, maybe not so much an organizer, as a laptop holder.
It is constructed of aluminum sheet, piano hinge, and some neat little latches I got from Pegasus Auto Racing Supplies.
The tacky weather stripping is to keep the laptop from bouncing. The laptop is held in place with velcro (I love this stuff).
I plan on affixing some pen/pencil holders to the inside and a document holder to the outside. This is a trial and error design method.
I'll be testing it out with some road work and then the big test will be the 54 hour Heart of Texas Rally coming up in 3 weeks.
Tuesday, February 17, 2015
Russel Day Long on a Triumph Trophy SE
This is a late post but I finally gave up on the Laam Seat and purchased a Russell Day long last summer.
The plan was for it to be completed and drop shipped to the start of the seven day Butt Lite 7 rally. I wasn't too enthusiastic about riding a 7 day rally with the Laam seat. Well, the seat didn't arrive in time so I had to suffer through with the Laam.
The seat did arrive before the rally end and I immediately installed it for the ride home (2000 miles).
As I have reported with my blogs on the Laam seat, seating comfort is a function of time. A seat that feels good for a Sunday morning run with you buddies, may not feel good after a full day, and so on.
I am very pleased with the RDL. Since I only had the rider seat converted the price wasn't that much higher than the Laam. I've put quite a few miles on it but so far nothing more than about 2 days at a time. So far I quite happy with the RDL and wish I would have stayed with my original plan to get the RDL first thing.
I'll know more later this year. I'm in the 54 hour Heart of Texas Rally in April, the 30 hour Mason Dixon 2020 in May, and the Iron Butt Rally in June. I expect that my days in the saddle and miles traveled to be 30 and 30,000 respectively.
Here are the pictures.
The plan was for it to be completed and drop shipped to the start of the seven day Butt Lite 7 rally. I wasn't too enthusiastic about riding a 7 day rally with the Laam seat. Well, the seat didn't arrive in time so I had to suffer through with the Laam.
The seat did arrive before the rally end and I immediately installed it for the ride home (2000 miles).
As I have reported with my blogs on the Laam seat, seating comfort is a function of time. A seat that feels good for a Sunday morning run with you buddies, may not feel good after a full day, and so on.
I am very pleased with the RDL. Since I only had the rider seat converted the price wasn't that much higher than the Laam. I've put quite a few miles on it but so far nothing more than about 2 days at a time. So far I quite happy with the RDL and wish I would have stayed with my original plan to get the RDL first thing.
I'll know more later this year. I'm in the 54 hour Heart of Texas Rally in April, the 30 hour Mason Dixon 2020 in May, and the Iron Butt Rally in June. I expect that my days in the saddle and miles traveled to be 30 and 30,000 respectively.
Here are the pictures.
Sunday, February 8, 2015
BMW Pillion Mount Aux Tank
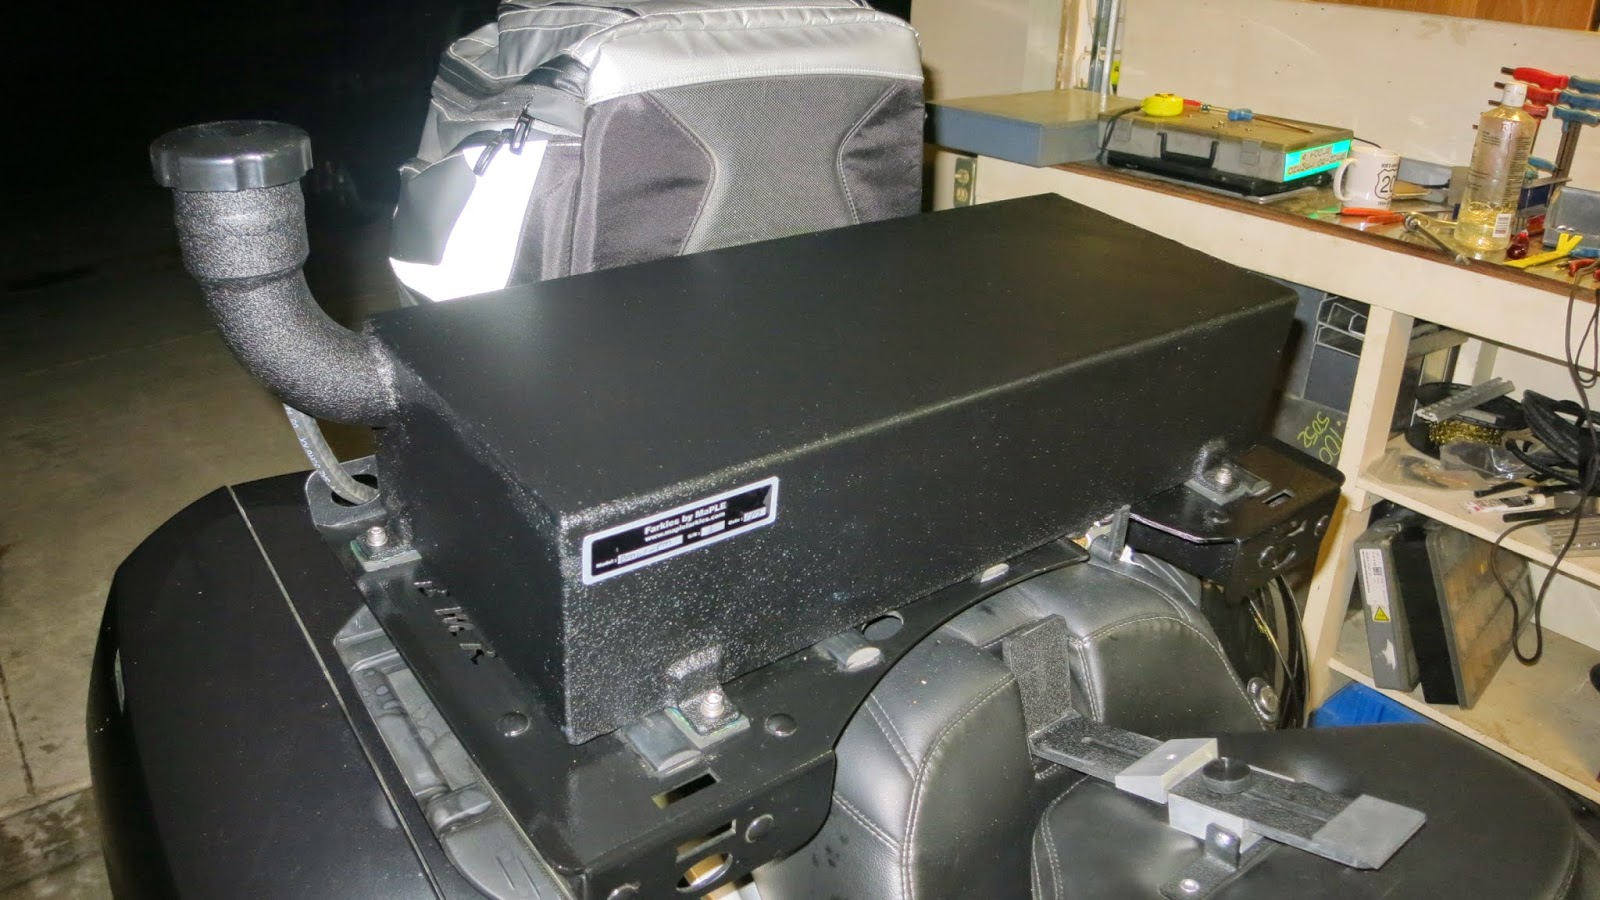
I recently had a client that wanted me to make an auxiliary tank to mount over the pillion seat on his K1600GT. He wanted to use his existing BMR shelf as the mounting.
The BMR shelf required a cutout for the shut off valve but otherwise it was a pretty straight forward job of building and mounting a tank. Stainless steel rivet nuts were installed in the BMR shelf and the tank bolted straight onto it.
Having access to the BMR shelf worked out perfectly for me. I was able to get the measurements I needed to make brackets and now have the solution to mounting a tank above the pillion seat using these stainless steel brackets I am now fabricating.
With these brackets I can fabricate and mount a tank that leaves the BMW top case intact. Alternatively, I can fabricate a longitudinal tank that extends from the rider's seat back over the tail rack.
This means that there are now three options for the BMW models that use the lattice type luggage rack, these models include: the K1600GT and GTL, all flavors of the R1200, the R, RT, and ST, the K1200GT, the K1300GT, and all variants of the F800, the R, S and ST.
Subscribe to:
Posts (Atom)